What Is Palo Alto FW High Availability?

High availability (HA) is a setup in which two firewalls are grouped together and their configurations are synchronized to prevent your network from having a single point of failure. In case one of the firewall peers goes down, a heartbeat link between the peers provides smooth failover. Using two firewalls in a high-availability pair offers redundancy and ensures business continuity.
By ensuring that an alternate firewall is accessible if the peer firewall fails, you may reduce downtime. To synchronize data — network, object, and policy configurations — and retain state information, the firewalls in a HA pair employ dedicated or in-band HA ports on the firewall.
Firewall-specific settings, such as management interface IP addresses or administrator profiles, HA-specific configuration, log data, and ACC information are not exchanged across peers.
You can create a HA pair by connecting two Palo Alto Networks firewalls. Both HA peers should be running the same version of PAN-OS.
A failover happens when one of the firewalls in a HA pair fails and the peer firewall takes up the responsibility of safeguarding traffic. The following are the situations that cause a failover:
One or more of the monitored interfaces fails
The firewall is not responding to the heartbeats of polls
One or more of the firewall’s designated destinations cannot be accessed
Hardware fails
HA Pairing for Palo Alto Firewalls
Palo Alto firewalls support two types of stateful high availability including session and configuration synchronization:
Active/Passive: In this mode, one firewall handles traffic actively, while the other is synced and ready to take over in the event of a breakdown. Both firewalls utilize the same configuration parameters, and one handles traffic actively until a path, connection, system, or network breaks.
When the active firewall fails, the passive firewall easily shifts to the active state and maintains network security by enforcing the same regulations. Active/passive HA supports Layer 2, Layer 3, and virtual wire deployments.
Active/Active: In Active/Active, both paired firewalls are operational, processing traffic, and session establishment at the same time. Both firewalls have their own session tables and routing tables that are synchronized. Active/active HA supports Layer 3 and virtual wire deployments.
How HA Pair Links Work
HA links are used by firewalls in a HA pair to synchronize data and preserve state information. Some firewall models feature specific HA ports, such as Control link (HA1) and Datalink (HA2), whereas others require you to utilize in-band ports as HA links. To handle communication and synchronization across firewalls, use dedicated HA ports on firewalls with dedicated HA ports.
The following are the HA links where every HA link has a specific job to do that include:
Control Link
The Control Link, also known as the HA1 Link, is used to send and receive messages such as:
Hello messages
Heartbeats
HA state information
management plane sync for routing, and
User-ID information
The firewalls also use Control Link (HA1) to synchronize configuration changes with its peer. It is a Layer 3 link that needs an IP address, and it uses ICMP to exchange heartbeats between HA peers.
The ports that are used by HA1 are:
TCP port: 28769, TCP port: 28260 for clear text communication
port 28 for encrypted communication
Data Link
The Data Link is also known as HA2 link and:
Synchronize sessions
forwarding tables
IPSec security associations, and
Uses ARP tables between firewalls in an HA
Except for the HA2 keep-alive, data flow on the HA2 connection is always unidirectional; it goes from the active or active-primary firewall to the passive or active-secondary firewall. The HA2 link is a Layer 2 link that defaults to ether type 0x7261.
The HA data link utilizes either IP protocol: 99) or UDP port: 29281 as the transport protocol, allowing it to span subnets.
Packet Forwarding Link
The packet forwarding link is also known as the HA3 link and is used to:
Deploy Palo Alto firewall in active/active mode
Forwarding packets to the peer during session setup
Asymmetric traffic flow
It is a Layer 2 link where MAC-in-MAC encapsulation is used, whereas Layer 3 addressing and encryption are not supported. On PA-800 Series, PA-3200 Series, and PA-5200 Series firewalls, Aggregate interfaces can be configured as an HA3 link.
Redundancy for the HA3 connection can also be provided via the aggregate interfaces; backup links for the HA3 link cannot be enabled. The dedicated HSCI ports on the PA-3200 Series, PA-5200 Series, and PA-7000 Series firewalls enable the HA3 link.
Because packets transiting the HA3 connection are added with a proprietary packet header by the firewall, the MTU over this link must be greater than the maximum packet length transmitted.
Backup Links
For HA1 and HA2 connections, these links provide redundancy. When dedicated backup links are not available, in-band ports can be utilized for backup links for both HA1 and HA2 connections.
When configuring back HA links, the IP addresses for backup links must not be overlapped with each other, HA primary link and HA backup link should be on different subnets, and HA1-backup and HA2 backup ports should be configured on separate physical ports.
If you utilize an in-band port for the HA1 or HA1 backup connections, Palo Alto Networks advises setting heartbeat backup on the management interface.
What are the Prerequisites for Configuring Active/Passive HA
You’ll need a pair of Palo Alto Networks firewalls that match the following requirements to set up active/passive HA:
Both firewalls in the pair must be running the same version of PAN-OS and have the latest application, URL, and threat databases.
Interfaces of the same kind
The same set of licenses, but each firewall’s license is unique and cannot be shared.
You must set up certain settings similarly on both firewalls and some separately on each firewall to set up an active/passive pair under HA. The following list outlines the parameters that must be configured in the same way on both firewalls:
If you’re utilizing in-band ports as HA links, the interfaces for the HA1 and HA2 connections must be configured to type HA on both firewalls.
On both firewalls, set the HA Mode to Active Passive.
If necessary, activate preemption on both firewalls. The device priority value, on the other hand, must not be the same.
Configuring Active/Passive HA on Palo Alto Firewalls
The technique below demonstrates how to configure a pair of firewalls in active/passive deployment.
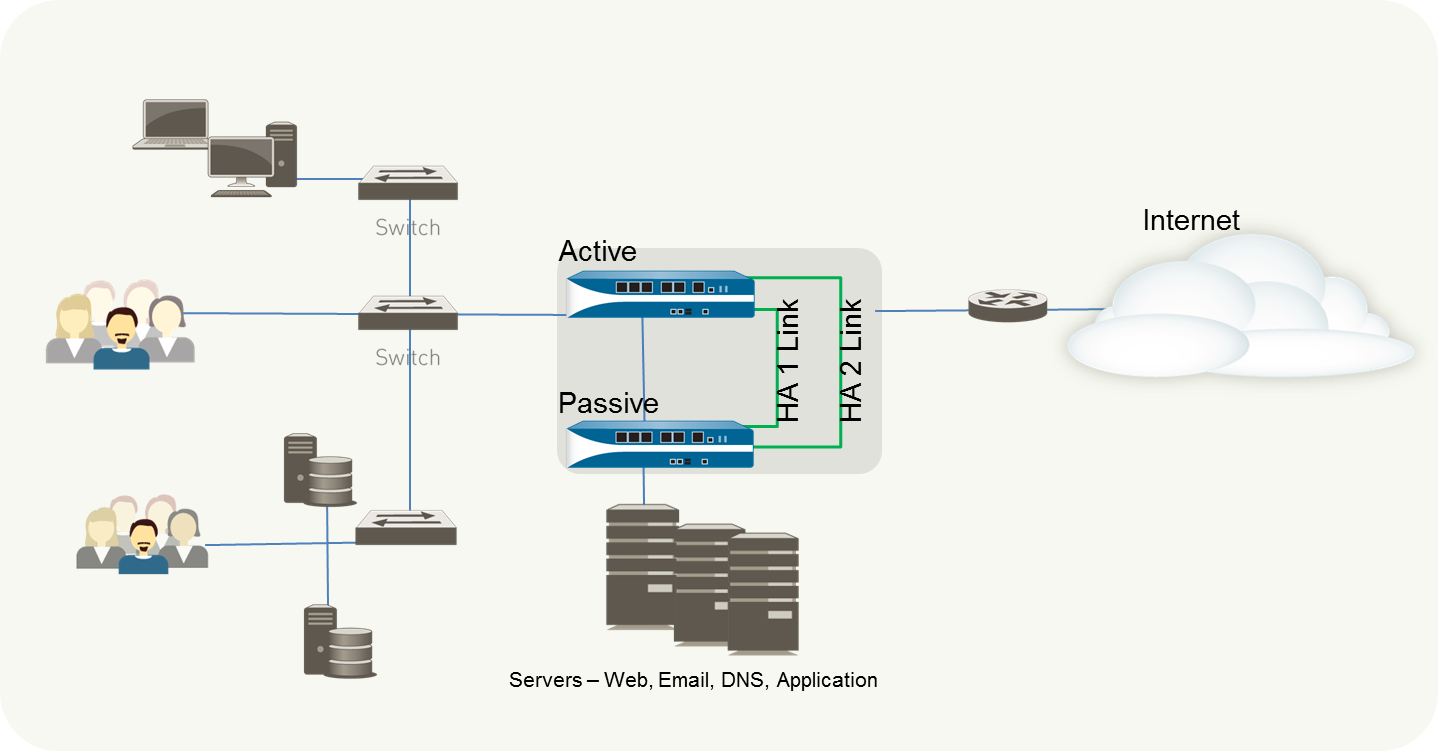
Let’s start the process with FW1 to implement active/passive failure.
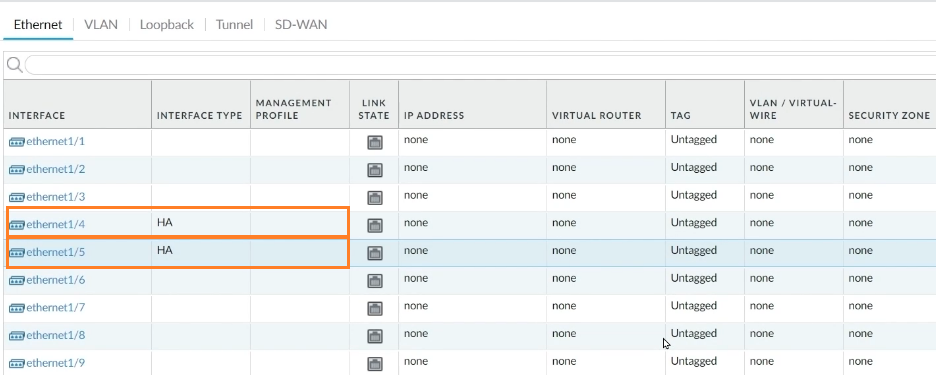
Step 1: Select Network -> Interfaces from the drop-down menu. We can see nine distinct interfaces in the Interface tab, and we’ll use Interface1/4 for the HA1 link and Interface 1/5 for the HA2 link.
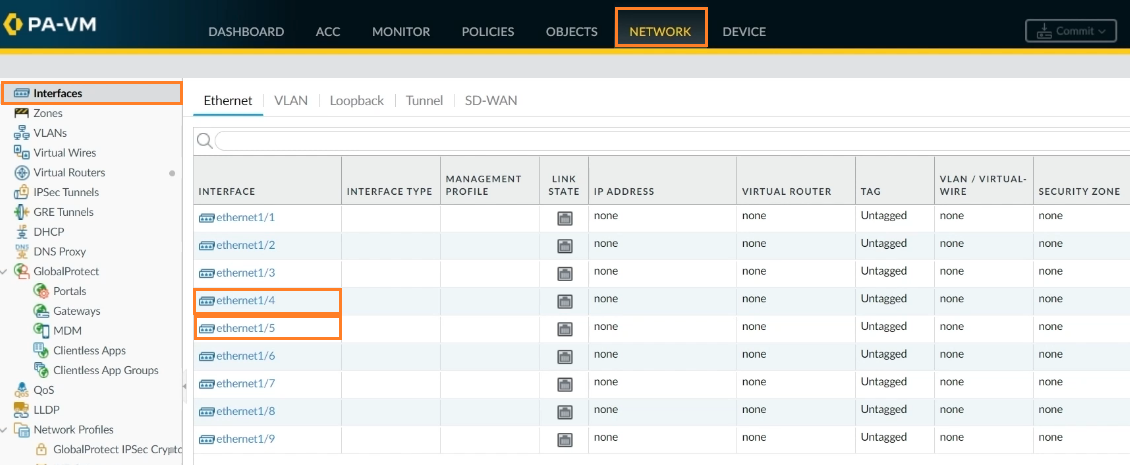
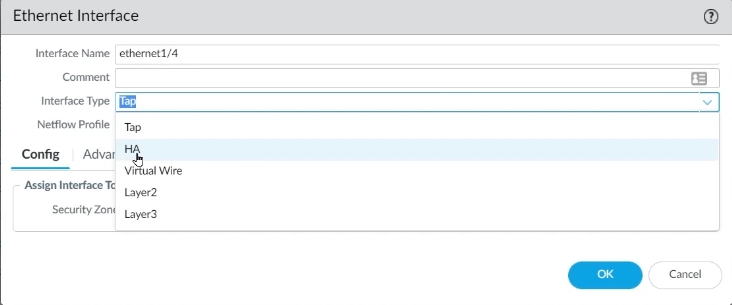
Step 2: Go to interface 1/4 on FW1 to choose the interface type. Select HA as the interface type and click OK.
Step 3: The same will be done with Interface 1/5. Select HA as the interface type for Interface 1/5 and click OK.
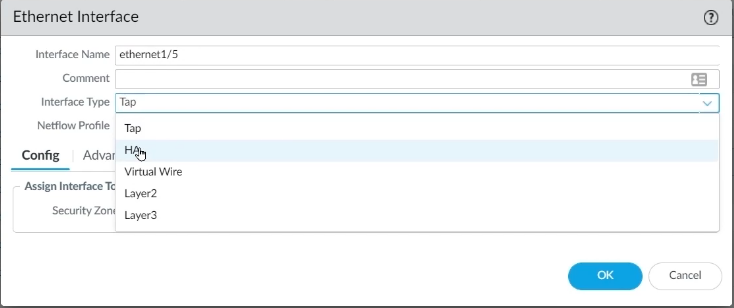
Both HA1 and HA2 interfaces are now ready for use.
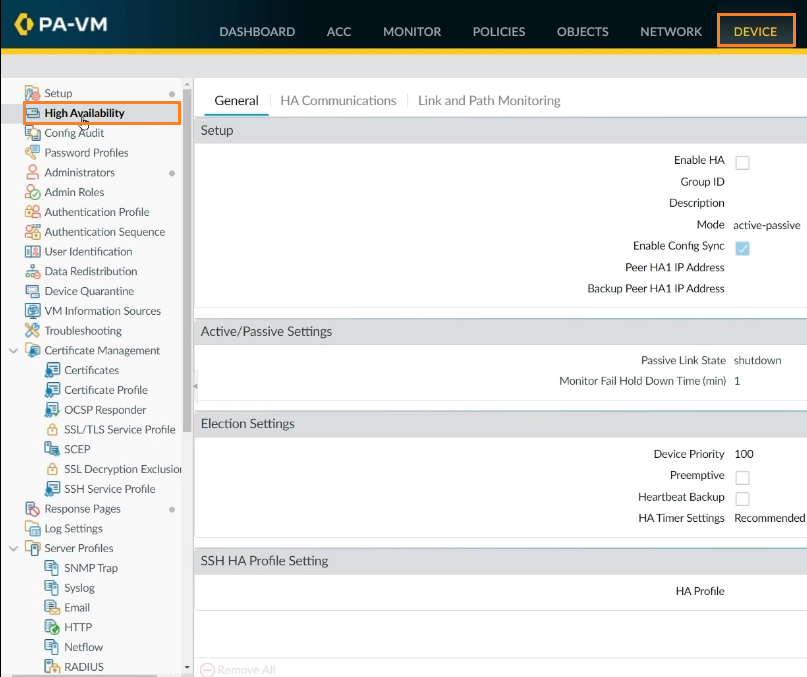
Step 4: Now proceed to the Device tab to finish setting the remainder of the HA. To do so, go to Device -> High Availability.
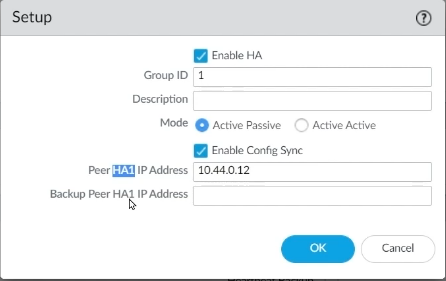
Step 5: Then, on the Gear icon, select Enable HA. Choose Group ID 1, Active Passive Mode, and Peer HA1 IP Address according to your design, then click OK.
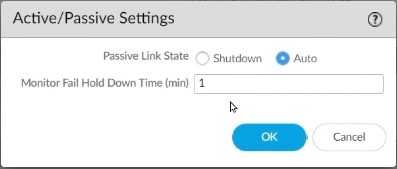
Step 6: Now, on Active/Passive settings, click on the gear icon, choose Auto in Passive Link State, and click OK.
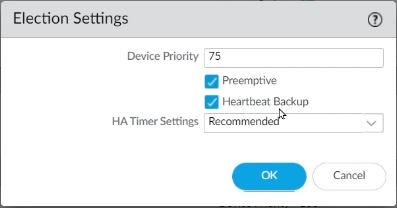
Step 7: On Election Settings, click on the gear icon, set device priority as 75 for choosing this FW as active FW. Then, enable Preemptive, enable Heartbeat Backup, and click OK.
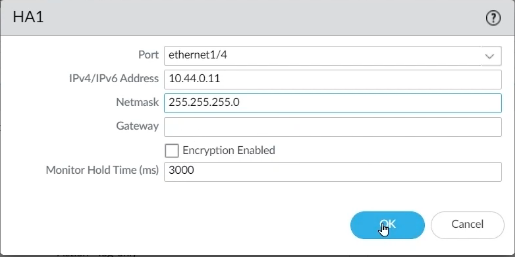
Step 8: Now it’s time to set up the Control Link. To do so, go to Device -> High Availability and click on the HA Communication tab to input the HA1 information. Click on the gear icon of HA1, select Interface 1/4 from the port, enter the IP address as per your design, enter Netmask. If both firewalls are directly connected, then no need to enter Gateway, click OK.
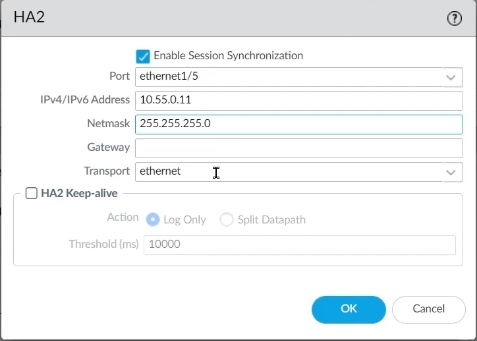
Step 9: To set up Data Links ports, go to the HA2 gear icon, pick Interface 1/5 from the port, input an IP address that matches the design, enter a Netmask, and click OK.
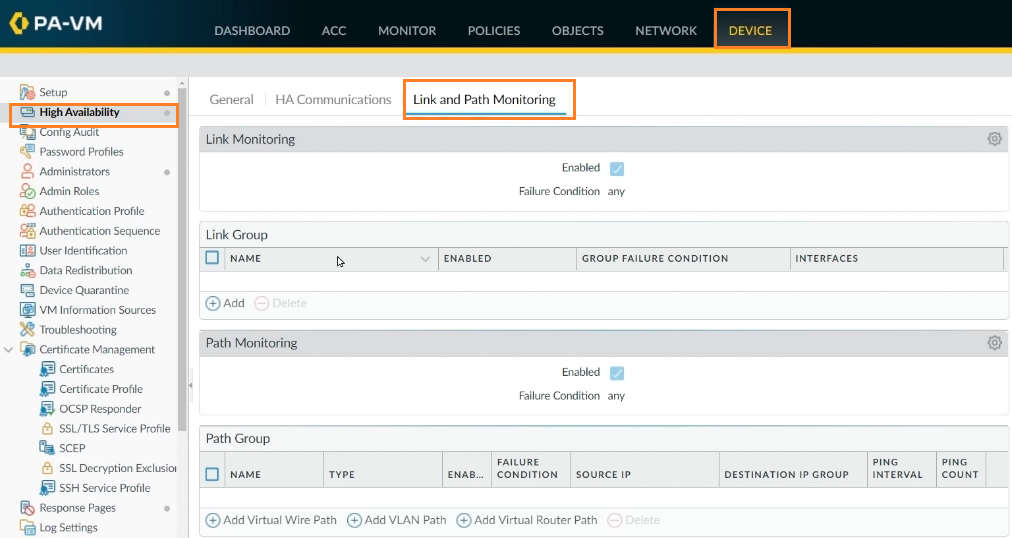
We can set up path monitoring and send ping queries to a location regularly. To do so, go to the Link and Path Monitoring page and keep everything set to default.
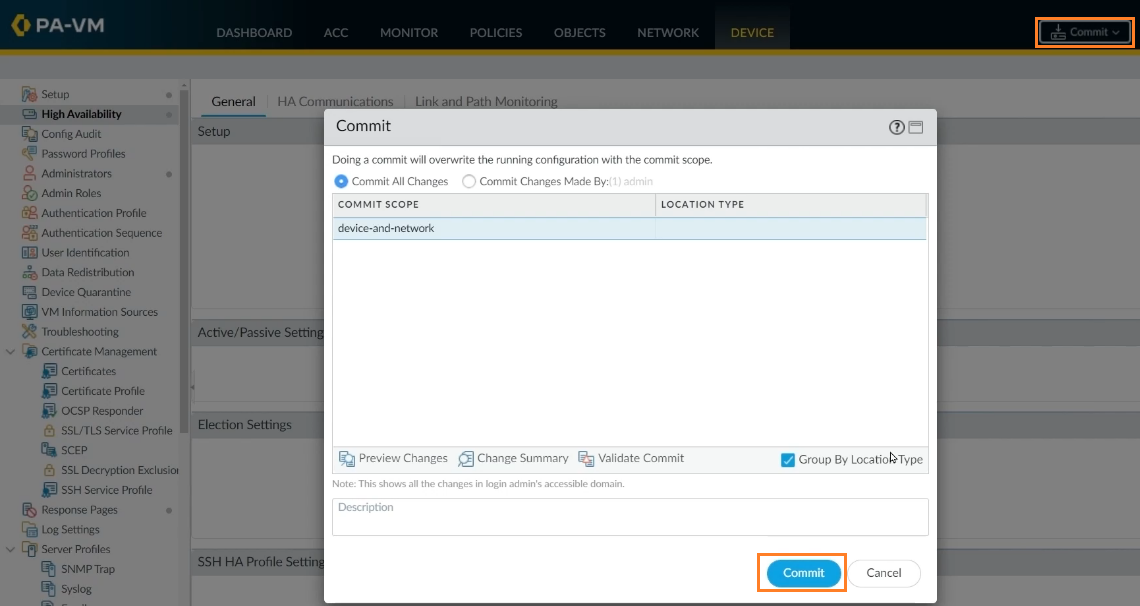
Step 10: If everything is in place as it should be, click Commit to accept the modifications.
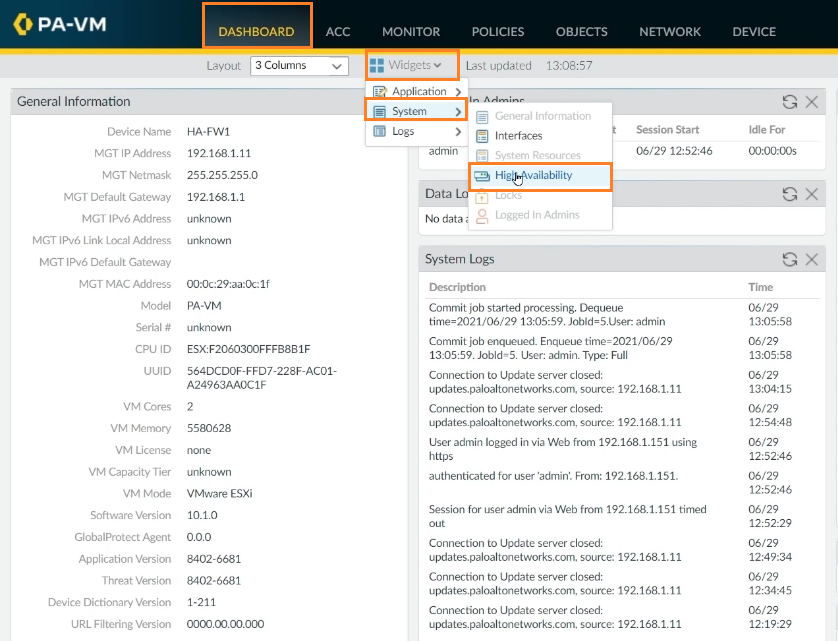
To verify the HA is properly configured on FW1, click on Dashboard -> Widgets -> System -> High Availability.
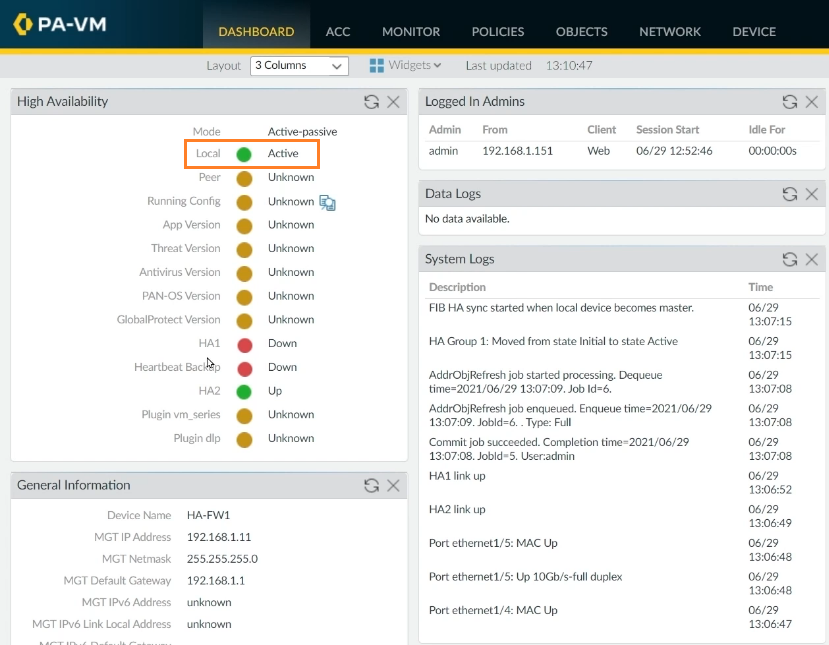
The HA is configured on FW1 and set to Active in Active/Passive mode.
Now, we'll configure FW2 in a Passive mode. Go to FW2, and repeat steps 1 to 9 with unique IP addresses according to your design, and at step 7, set the device priority to 100 to set it up as a passive firewall.
Verify your configurations according to the design, and click on Commit according to step 10 to save configurations.
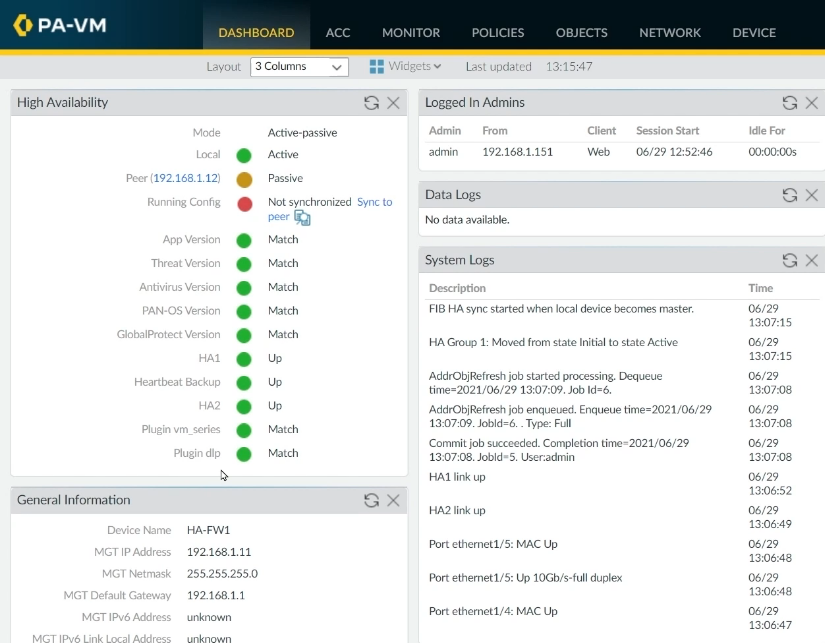
Now, go back to FW1, click on refresh. FW1 is currently working as Active, and the peer firewall (FW2) is working as Passive.
Final Thoughts
Palo Alto firewalls may be set up as a high-availability (HA) pair with session and configuration synchronization to ensure that any session runs without interruption. The high availability design ensures that one of the two firewalls is always accessible to sustain network traffic, reducing network downtime significantly. The firewalls can be set up in a stateful Active/Passive or Active/Active high-availability configuration.
If the firewall’s high availability is compromised, your environment may become vulnerable to nasty virus assaults and unauthorized access, both of which can inflict irreversible damage. To ensure that your environment is secured against network attacks, check the Palo Alto firewall’s high availability status often.
delivered to your inbox.
By submitting this form you agree to receive marketing emails from CBT Nuggets and that you have read, understood and are able to consent to our privacy policy.