32 Expert Microsoft PowerPoint Tips to Look Like a Pro

Communicating your ideas effectively is essential in any organization, and Microsoft PowerPoint is a powerful tool to help you do just that. With features that go far beyond simple slides, PowerPoint enables you to create engaging, professional presentations that leave a lasting impression.
Whether you're a seasoned pro or just getting started, these tips and tricks will help you make the most of PowerPoint's latest tools and features, including AI-powered design suggestions and seamless collaboration options.
Microsoft PowerPoint Presentation Tips
If you want to look like a pro during your presentation, here are a few tips:
Reading view is super helpful when you want to preview a slide and its animations without launching a full Slide Show. I use two monitors at my desk. If I run the actual show, it launches into Presenter View across both screens. As much as I love the Presenter View, the Reading View is much better when previewing a presentation. Find it on your View tab, or look for the little open book button at the bottom of the screen.
Custom Shows are a great way of using a subset of your slides for a particular audience without creating a separate file. It's much easier than keeping multiple versions of the same presentation up to date. Find the Custom Slide Show option on the Slide Show tab.
Make Quick Format Updates to Your PowerPoint
You likely know PowerPoint allows you to adjust the size and type of font you use, but it pays to have a few tricks to make navigating changes easier.
Do you have your text point size at 10.2 or 14.6? Yes, you can specify to a tenth of a point. Just type directly into the Font Size box. Use CTRL-A to select all the fonts in a box or on a slide if you want to change the size of all the fonts.
If you need to arrange text in columns, right-click on the text, choose Format Shape, and track down the Text Box options in the task pane on the right-hand side, then click Text Options. You'll see a button at the button that says Columns.
Is the bullet too close to the text? If your ruler is showing (turn it on from the View tab), you can click and drag the little triangles to adjust the spacing between bullets and text. Hold down your CTRL key while you do it for even more control.
Do you find that every time you add a text box, you change the spacing, color, or whatever to the same thing? Then, it might be worth setting the default text box for that presentation. Create the perfect text box, right-click on its edge, and choose Set as Default Text Box.

Have you ever diligently deleted speaker notes one slide at a time? Use the Document Inspector (File, Info, Check for Issues, Inspect Presentation) to remove all speaker notes in one go. You can also check for accessibility and compatibility here.
If you need some random text in PowerPoint, type =rand() or =lorem().
While you can copy and paste slides from one presentation to another, a neater way of doing this is with the Reuse Slides feature. Find it by clicking the bottom half of the New Slide button on the Home tab.
Disclaimer: I’m not promoting using acres of text on PowerPoint slides, but I realize that some of you use PowerPoint for things other than presentations.
When you know how to use PowerPoint efficiently, meetings run smoother—and your ideas land better. Earn the Microsoft PowerPoint Associate certification to show you can create clear, effective presentations that drive results.
PowerPoint Graphic & Drawing Tips
Images are the key to a powerful presentation! Here are a few tips to make adding drawings and graphics a breeze in PowerPoint.
Do you need to make a white logo black or vice versa? Click the graphic to the Picture Tools ribbon tab, click the Corrections button, and choose Picture Correction Options at the bottom. This opens up the Format Picture pane at the right, where you can slide the brightness down to the left to make a white logo black or up to the right to make a black logo white.
Are you struggling to find a tool that creates a word cloud that you like? Create it manually in PowerPoint, and make it look exactly how you want it to. When you’re happy with it, select the lot and right-click to Save as Picture to use wherever you need it. Don’t forget to save the PowerPoint file in case of future edits.
Want to draw lots of the same shapes one after the other? Right-click on the shape in the gallery and choose Lock Drawing Mode.
You can change the shape of shapes by right-clicking on one and choosing Edit Points. While in this mode, right-click again on the edge of the shape for more options.
Microsoft Powerpoint Video Tips
Rather marvelously, PowerPoint allows you to trim videos, which is perfect if you only want to use 36 seconds of a seven-minute video. But my biggest video tip is this: Use the Compress Media option in the File menu to remove the six minutes and 24 seconds of the video you don’t need — and dramatically reduce your file size.

Here are a few other tips that will make adding or recording videos easier:
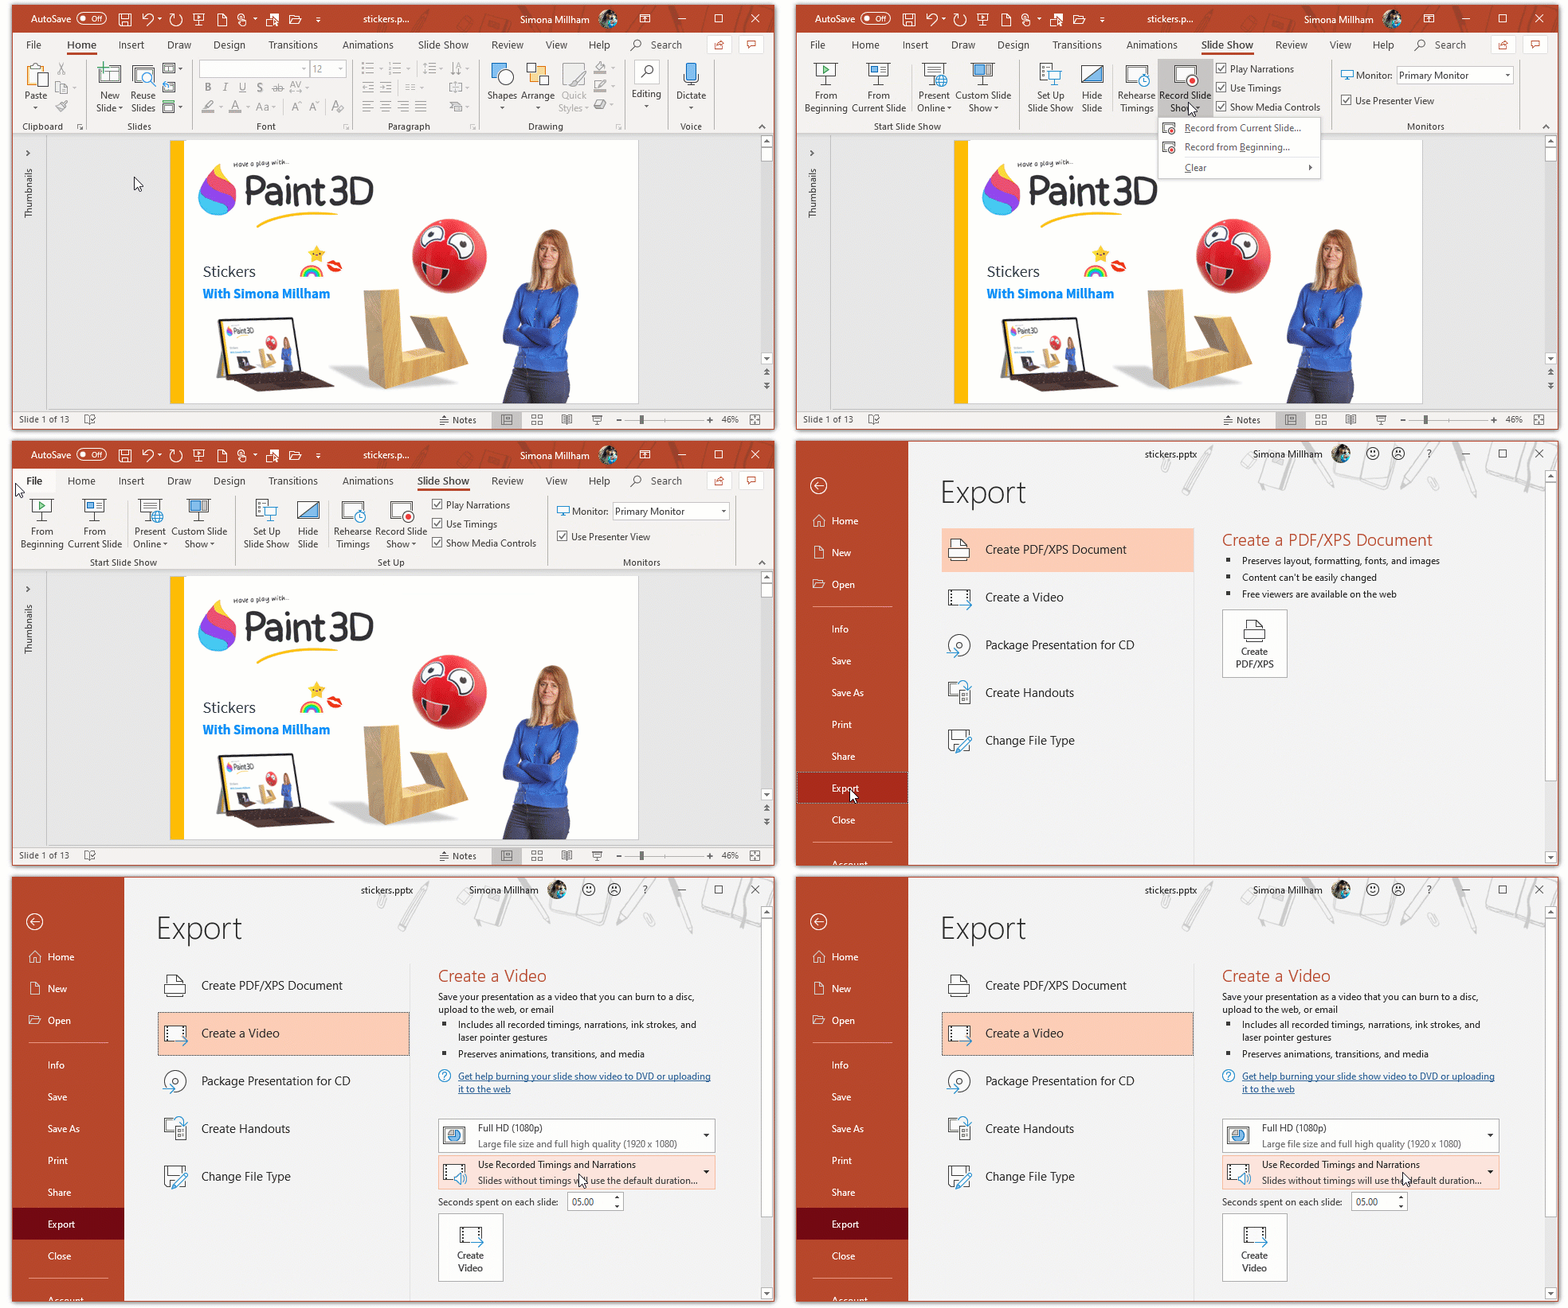
To create a video of your presentation, record voice narrations slide-by-slide. Then, go to the File menu, choose Export, and Create a Video. This is much easier than recording it all in one take.
By default, when you insert a video, it is embedded rather than linked. This is useful for most of us but can make file sizes enormous. If you prefer, click the down arrow next to Insert when you select your video and choose a link instead. However, ensure you have the source file available when running your PowerPoint show.
If you add bookmarks to your videos, you can quickly jump to key places in the video during your presentation. Even better, you can use animation effects to have text or other objects appear on the slide at those points. Choose the required animation effect and then select the bookmark necessary from the Trigger button.
If you use the heading styles in Word, you can quickly create the skeleton of a PowerPoint presentation from the Word document. In PowerPoint, click the bottom half of the New Slide button, choose Slides from Outline, and select the Word file. Any Heading 1 styles will be slide titles, and Heading 2 styles will be bullets. OK, if that didn’t make sense, see it in action.
To vertically align text so that it sits at the top, middle, or bottom of a text box, use the Align Text button.
PowerPoint Animation Tips
Animations give your presentations a little something extra. While I don't recommend using some of the more cheesy "transitions," this can help you create a more polished presentation.
Give your “Fly-In” animations a bit of extra polish. I particularly like adding a little bounce at the end! Apply the Fly-In animation effect to an object, and show the Animation Pane (on the Animation tab) from which you can choose Effect Options for the required item.
Want to have a bit of fun animating 3D models? Add one from the Insert ribbon tab, then try the animation effects on the Animations tab. Is it just me, or is this cool?!
The PowerPoint Morph Transition, available in Microsoft 365 and other paid versions, creates smooth animations between slides by automatically moving resizing objects for a polished effect.
PowerPoint Keyboard & Mouse Shortcuts
Keyboard shortcuts are the key to creating faster presentations! Clicking a few buttons instead of searching around in the menu makes it faster to develop presentations and makes presentations easier. Here are a few of my favorite PowerPoint shortcuts:
Press ALT+F5 to practice with Presenter View on a single monitor.
If you want to duplicate a picture or shape in PowerPoint quickly, select the item and press CTRL+D. Then, move the shape and press CTRL+D again as many times as you like.
Press CTRL+M to insert a new slide of the same layout as the active slide.
Press CTRL+ENTER to move from the Title text placeholder to the Bulleted List text placeholder … and then press CTRL+ENTER again to create another slide. It's a great way of hammering out the outline of a presentation if you’re fast on the keyboard!
You might know that F5 starts the Slide Show from the first slide. But did you know that SHIFT+F5 starts at the current slide?
You can return to the first slide by clicking and holding your left and right mouse buttons together for two seconds.
PowerPoint guides on the View tab are useful for lining things up. But did you know you can change their color or add extra ones? Show your guides and right-click on one to see the options. When you click and drag a Guide, which can be found on the View ribbon tab, you see a measurement telling you how far from the center point of the slide it is. To see the measurement from the guide's starting position, hold down your SHIFT key while you click and drag.
AI Features in PowerPoint
Microsoft PowerPoint’s AI-powered tools, available in Microsoft 365, make creating polished presentations easier than ever. These features save time and help you create presentations that look professional and engaging with minimal effort.
The Designer feature automatically generates slide layout suggestions based on your content, making it much easier (and faster) to create new presentations.
Presenter Coach uses AI to analyze your delivery and provide real-time feedback on pacing, tone, and filler words.
For quick visual enhancements, the QuickStarter tool generates pre-built slide decks with researched content and design ideas.
Learn More About Microsoft PowerPoint
PowerPoint is constantly updating and adding new features and plugins. To stay on top of new features, follow Simona on LinkedIn. She shares tons of tips and training for PowerPoint, Excel, and Microsoft Office.
Start a free week with CBT Nuggets to check out Simona's training for popular tools like Microsoft OneNote and Agile Project Management.
delivered to your inbox.
By submitting this form you agree to receive marketing emails from CBT Nuggets and that you have read, understood and are able to consent to our privacy policy.